
Make your own amazing Vegan Jerky with just a few ingredients and simple steps!! This smoky, savory creation has plenty of spice and an awesome chewy 'meat'-like texture! A go-to for healthy vegan snacks, camping food, lunches, etc!!

In the last few weeks, I've totally become a Vegan Jerky addict. Actually, I've been one for a long time, but the price of those tiny store-bought packages kept me from indulging often.
Keep reading if you like vegan snacks that are savory, healthy, protein-rich - and cheap! You're going to LOVE this vegan jerky!

Related recipe: Baked Tofu Nuggets with Buffalo Sauce
What is vegan jerky made of?
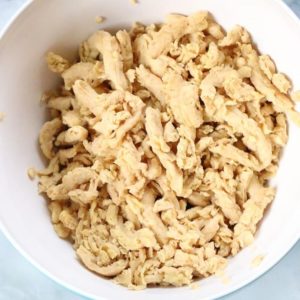
The main ingredient in vegan jerky is Soy Curls, which are are a vegan meat alternative. My favorite brand is Butler Soy Curls, their soy curls are consistently reliable for all my vegan cooking. They are made from 1 ingredient: non-GMO whole soybeans that are grown without chemical pesticides. You can get some here.
These soy curls are seasoned with a few seasonings that give them a distinct jerky flavor. Keep reading to see how easy it is to make this soy curls jerky!
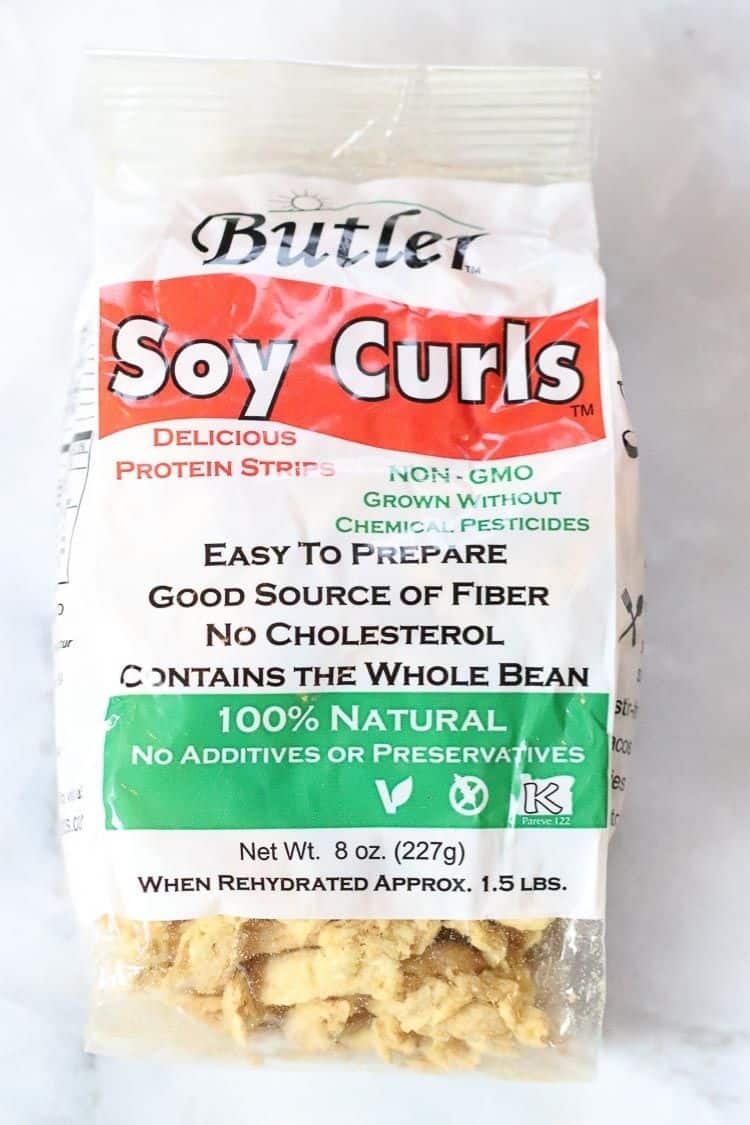
My favorite soy curls for vegan jerky
What else you'll need to make Vegan Jerky:
- Braggs Liquid Aminos - You can switch this for soy sauce if you must, but this is truly a vegan pantry essential. It's gluten-free, lower in sodium than soy sauce and uber-flavorful. (Found in most health-marts or here.)
- Vegan Worcestershire Sauce - I used the Annies's brand. If you need a gluten-free Worcestershire sauce, try this Wizard's one.
- Wright's Hickory Smoke - This gives the jerky that wonderful smoky flavor!

The steps for how to make vegan jerky:
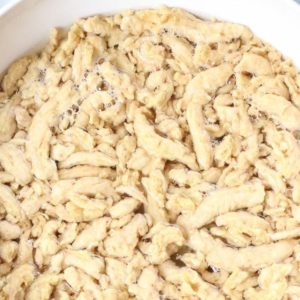
Start by soaking 8 oz of the soy curls (the whole 8 oz bag, or about 4 dry cups if you're using a bulk package) in a large bowl of water for 5-10 minutes. (Photo 1 & 2)
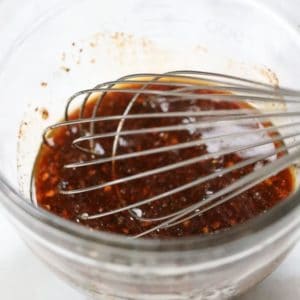
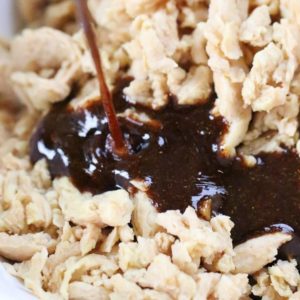
While the soy curls are soaking, gather your ingredients, measure into a med sized bowl and mix together well. (Photos 3, 4 & 5).
Now drain your soy curls well, pressing lightly to remove excess water. (Photo 6)
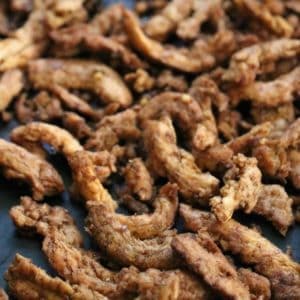
Pour the smoky sauce over the drained soy curls and mix well. Spread the soy curls on a parchment covered tray and bake for an hour, turning approx every 15 minutes. (Photos 7, 8 & 9.)

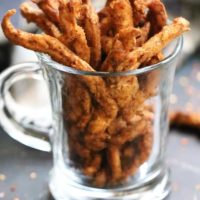
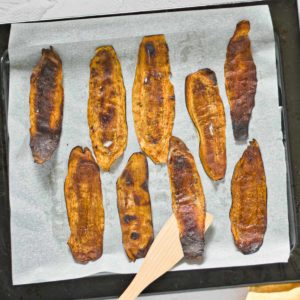
Here's what this epic vegan jerky looks like right out of the oven. Oh so good! (Even my spice-hating 3-year-old downs this spicy stuff - he just asks for a cup of water to go with it!!)

So chewy right out of the oven!
Pro tips for making jerky:
- You can add or subtract 10 minutes to the baking time for just a little more 'chew' or a little softer end result. Just remember, it dries and hardens a bit as it cools so be careful not to bake too long.
- If you like spicy at all, I'm guessing you'll like this recipe as is. If you're a real lightweight when it comes to spice, cut the cayenne and crushed red pepper in half. But don't eliminate them! Really contributes to the flavor, promise!

Storing this jerky:
- Just to be on the safe side, I keep my vegan jerky in the fridge. I'm sure it would keep in there up to a couple weeks but we haven't been able to make it last that long yet!
Well folks, here's to hoping you love this Epic Vegan Jerky as much as I do!
Looking for more vegan snacks?
- Spicy seasoned pretzels
- Vegan candied pecans
- Mom's best salsa
- Vegan nacho cheese
- Best vegan egg salad
If you’ve tried this Epic Vegan Jerky recipe or any other recipe on my blog then don’t forget to rate the recipe and let me know how you got on in the comments below, I LOVE hearing from you! You can also FOLLOW ME on FACEBOOK, INSTAGRAM and PINTEREST to see more delicious food!!!
DID YOU MAKE THIS RECIPE?? PLEASE CLICK ON THE STARS TO GIVE IT A RATING BELOW!!
Recipe
Epic Vegan Jerky
Ingredients
- 1 8oz. Soy Curls, or approx. 4 cups dry
- ¼ cup Braggs Liquid Aminos, may sub Soy Sauce but decrease salt if using soy sauce
- ¼ cup Vegan Worcestershire Sauce
- ¼ cup Olive Oil
- 2 teaspoon Chili Powder
- 2 teaspoon Onion Powder
- 2 teaspoon Garlic Powder
- 1 teaspoon Cayenne
- 1 teaspoon Crushed Red Pepper Flakes
- ¼ teaspoon Seasoned Salt
- 1 teaspoon Wright's Hickory Flavor Liquid Smoke
Special equipment
Instructions
- Preheat oven to 250 degrees Fahrenheit and cover baking tray with parchment paper or equivalent.
- Start by soaking 8 oz. of the soy curls (or about 4 dry cups) in a large bowl of water for 5-10 minutes.

- While the soy curls are soaking, gather your ingredients, measure into a medium sized bowl and mix together well.
- Now drain your soy curls well, pressing lightly to remove excess water.
- Pour the smoky sauce over the drained soy curls and mix well.
- Spread the soy curls on a parchment covered tray and bake at 250 degrees for an hour, turning approximately every 15 minutes (see notes for baking time).
Notes
- You can add or subtract 10 minutes to the baking time for just a little more 'chew' or a little softer end result. Just remember, it dries and hardens a bit as it cools so be careful not to bake too long.
- If you like spicy at all, try this recipe as is. If you're a real lightweight when it comes to spice, cut the cayenne and crushed red pepper in half. But don't eliminate them! Really contributes to the flavor, promise!
- Just to be on the safe side, I keep my jerky in the fridge.
Nutrition

Kathe
My question is not how to store the jerky but rather how to stop eating it! This "PETA" jerky is so yummy and addictive 🙂
Kate
Yes that can definitely be a problem!! Would you be able to leave a star rating since you enjoyed this recipe? Those 5 star ratings really help us 🙂
Pyatrus
Thank you, Rebecca for a great recipe & commenters Christine (re: using a dehydrator), denise (re: adding blackstrap molasses & ground ginger), & Christina (re: soaking in the marinade) for great suggestions!
We made a double recipe (we had bought a 12-lb box of Soy Curls). We halved the amount of Crushed Red Pepper Flakes & the Cayenne (plenty of flavor for us with the smaller amounts -- we had found Butler Foods Jerky too spicy). We did not salt (enough salt with the other ingredients for us). We did add 1 teaspoon of Costco Organic No-Salt Seasoning instead.
We soaked in the marinade overnight as one step (overnight only because we got a late start) & didn't use a separate soaking step, as Christina suggested (thanks!). We used our Tribest Sedona Dehydrator, "fast" mode at 130 degrees for 3 - 6 hrs. (A double batch fills 4 trays, with silicone sheets.)
We started to remove the smaller, thinner, smaller jerky pieces after 3 hours. Then we checked every 30 minutes or so, rotating the trays every hour, & turning over the thicker, wetter pieces, & also removing jerky that met our preference (we didn't want them too dry).
Yes. We agree. It's difficult to keep the jerky around for long. And yes, we refrigerate what we make (that lasts that long!).
Rebecca
Thank you so much for your detailed comments! That is very helpful for others wanting to use similar methods! So glad you are enjoying the recipe!
judoman2013
I received some commercial vegan products as a gift, and I wondered if I could make them. Your recipe is as good as what I've had before, and it's quite good. Thanks.
Rebecca
So glad you like it! Making vegan cheese is so much fun!
denise
I have made without oil and they come out crunchy! I have a batch in the oven now and wish I had read this first - I had forgotten about that
Linda York
We've made these 3 times now and it is the best vegan soy curl jerky recipe ever!! Thank you so much for this recipe. Husband can't stop eating it!!
Rebecca
Thanks so much for the comment! So happy you love it and that the hubby is happy! Score!
Morgan Thompson
Has anyone tried this with Teryaki? I got turned onto this recipe from Sarah's Vegan Kitchen
Rebecca
I'm sure that would taste great!! Just try to keep the liquid ingredient amount similar to the recipe or plan on a little longer baking time!
Christine
Tried this using my Excalibur dehydrator at 145 degrees for about an hour, rotating the racks every 15 or so minutes. The taste and texture is great!!
Rebecca
Awesome! So glad you like the recipe and really appreciate the time and setting information for the Excalibur dehydrator!
denise
I add about a Tbls blackstrap molasses and a teasp ginger. I prefer rehydrating in water, then rinse and press as much as I can before adding marinade to rehydrating right in the marinade. Takes out the weird 'sweet' taste soy curls have. It's not like there's anything going to waste- the curls suck it all up! Thanks for the recipe! I will often make 1 1/2 times the recipe and saute some while they're baking, heck, I can eat these without any cooking!
Rebecca
Hey thanks so much for your comment and for sharing your method! Love soy curls and I agree these can be eaten at just about any stage of cooking! Ha!
Christina D Simons
I don't like shopping at Walmart, but they have a combination air fryer/toaster oven that's big enough for an entire batch and doesn't take up double counter space. About $80! I love mine.
Christina D Simons
I make the marinade and add about 3/4 c water. Then I soak the dry curls IN the marinade until they've soaked it all up (I use a biz Ziploc bag and flatten it out on the counter. Every time I walk by I flip it to the other side; the process takes a couple of hours, but the marinade is ALL soaked up by that time, so there is NO waste.). Then I air fry them for 25 minutes. We can't cram them in our mouths fast enough--delicious and chewy. Great low-cal snacks or salad toppings. I've even used them in soup.
Rebecca
Love your method! And I envy your air-fryer! The more I hear about these, the more I think I might just have to break down and buy one! Thanks for commenting!